Jigging Assist Hook - Knotless / Splice
This is one of my favourite DIYs. So lets go through some of the 'ingredients' needed :-)
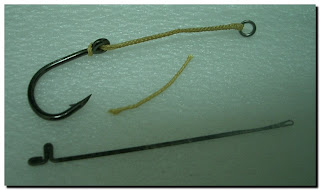
1) Hollow kevlar  2) Sharp scissor :-p duh....kekekeke....

3) Splicing Needle
And off we go!!! It took me a few trials and errors in the beginning to get it right. And since the needles and kevlars comes in different sizes, you need to match them. And the main thing is to estimate the amount of kevlar needed, and the points where you want to insert the splicing needle.
Start off by inserting the needle completely in the hollow kevlar.

 Once it's through, hook on to the other end of the kevlar and gently pull it through.
 Please note, no force or turning is needed here. Just some gentle massage will do.
 Once it's through, some trimming and massaging and it's done.
 The 'massage' helps to tighten the 'spliced' part of the kevlar so that it will not slip. Apply some super glue for added security.
 And now to hook it up.

 And the same applies to the other end.

 The difference here is to loop in a solid ring before splicing the kevlar.

 Same process...massage gently...
 Voila!
 Trim off the excess. The excess can also be left out as added security, with a bit of glue applied.
 And there you have it :-) Knotless Jigging Assist Hook.

One of the common question ppl have with this way of splicing is 'won't the knot slip?'. The beauty of this knot is that, once you pull on both end of the knot, the entire kevlar is being tighten. So the harder you pull, the tighter the entire knot becomes. I've tried pulling the knot with 60lbs nylon leader and the leader gave way. Of course, for additional security, apply some glue on some crucial points, or wrap the crucial points tightly with dental floss.
Hope the above pictures are informative :-)
- to be continue -